Posts tonen met het label Archeology. Alle posts tonen

woensdag 28 september 2016

True replicas: Ye, the model- and mould maker


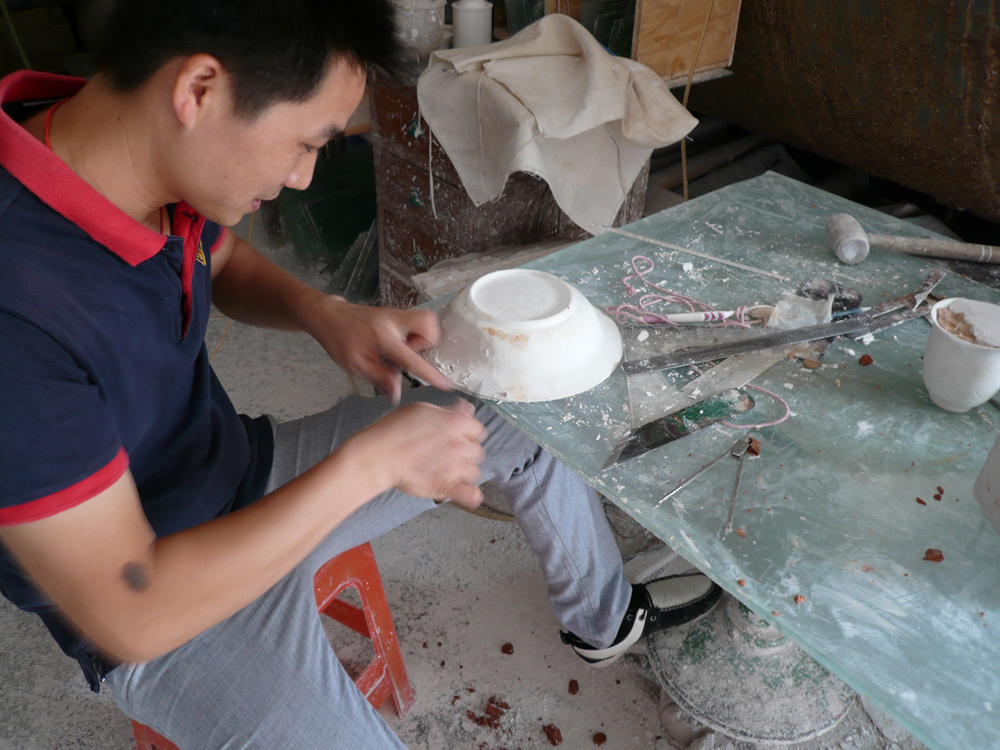
In Jingdezhen there are almost endless different neighborhoods specialized in different steps in the process of making ceramics. From clay refining to glaze mixing and from throwing pots in all sizes and shapes to carving incredible detailed decorations.  This process of porcelain making and all its steps are portrayed in the Museum of the Imperial Kiln site in the city. Today I was in Sculpture factory, one of these areas visiting Ye. He is modeling with and after my 3D prints, thus repairing the fractures and missing pieces. This resulted in a series of slibcasting moulds in plaster for porcelain casting. 


zondag 11 september 2016

True Replicas: the objects

Together with Archeologist Steven Jongma of Delft Heritage, I sellected 5 objects excavated in Delft. They all date back to the 17th century, are made of porcelain and are manifactured in China, probably Jingdezhen. This kind of porcelain was made specially for the export marked, following the 'western taste'. Some are broken and restored, some are broken and just put together.

'Klapmuts': A-2-21, excavated in 1972

'Klapmuts': A-2-21, excavated in 1972

cup, DL 88 V15

cup, DL 88 V15

'Klapmuts' OLD 74-1-1, excavated in 1974

'Klapmuts' OLD 74-1-1, excavated in 1974

Bowl, V4/7, excavated in 1986

Bowl, V4/7, excavated in 1986

Bowl, V4/7, excavated in 1986

Cup with relief, OKL 3

Cup with relief, OKL 3


maandag 5 september 2016

True Replicas: just arived in Jingdezhen

I Just arrived in Jingdezhen, the world capital of porcelain. The city in South China where lays the origin of this magical material, that became so wanted all over the world. I am invited by Museum Prinsenhof in Delft to develop work for the exhibition at this museum about Prcelain from the emperial kilns. I wil work on this project together with artist and sculptor Hans van Bentem and designer David Derksen. The first impression of the city is overwelming: porcelain is everywhere!


zaterdag 27 augustus 2016

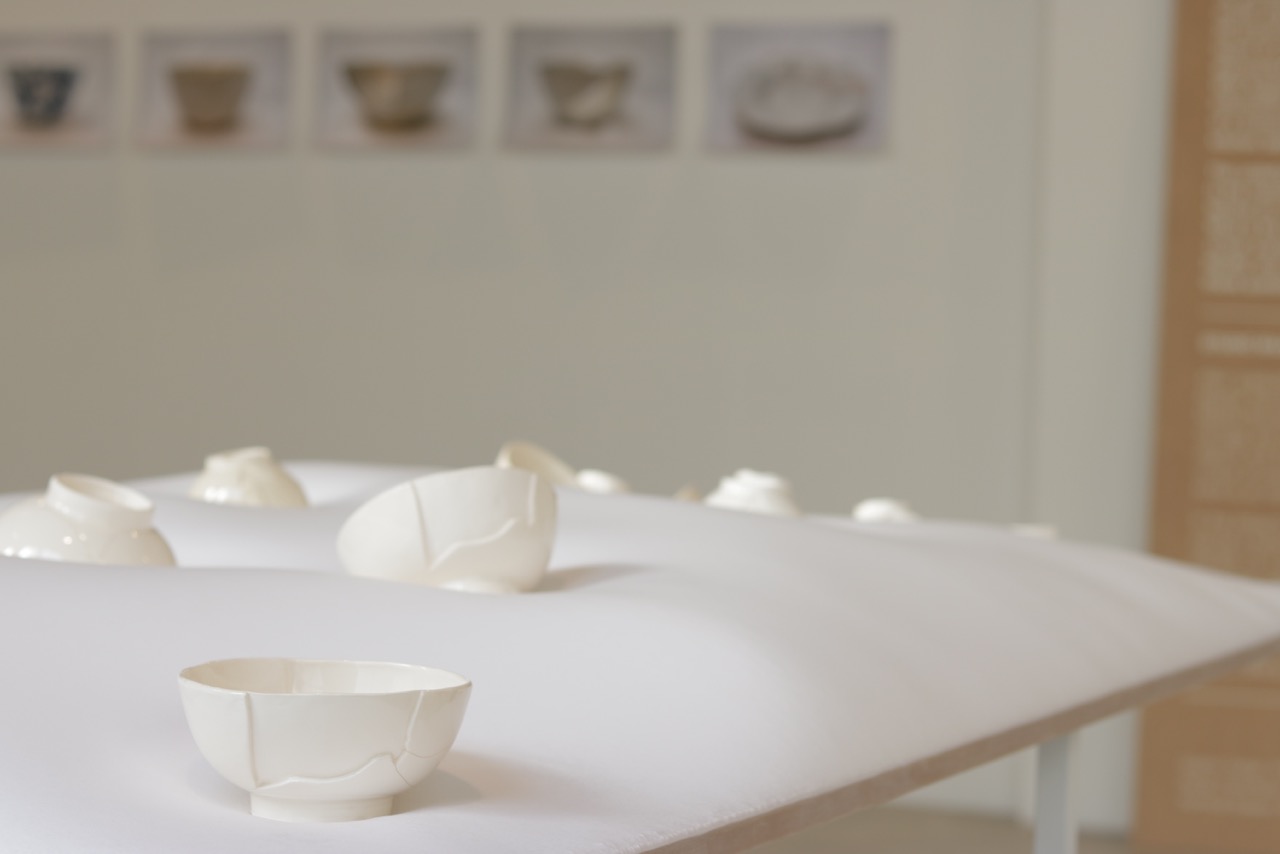
Now (27&28th of August) on show at DROOG Amsterdam: True Replicas

foto: Jantien Roozenburg

The two projects presented here examine how 3D prototyping and virtual techniques can be utilised to bring the stories of our heritage back into daily life.

3D prototyping are emerging technologies that offer new possibilities to render physical objects into digital data and vise versa, such as 3D-scanning and -printing. With Augmented Reality one can add virtual layers of contextual information on to an object, that can than be discovered using an application on a smartphone or tablet.  With Augmented Reality, objects are enriched and transformed into information carriers that can enrich the story of an object beyond the walls of a museum, archive or a library. Bringing the story of our heritage to our kitchen tables.

The underlying questions we seek to answer with these projects are; What is the meaning stored  in  all these historical objects? How does the story behind an object change our perception and appreciation of that object? What is the relevance of these objects in our increasingly digital and virtual society? How are these stories relevant to us today? Augmented Reality and 3D prototyping offer opportunities to investigate answers to these questions.


foto: Jantien Roozenburg

foto: Jantien Roozenburg

foto: Jantien Roozenburg

donderdag 17 maart 2016

Plaster prints, structural solutions and CNC-milling, by Kotryna Valečkaitė

This week we focused on production techniques, yet not all of them proved to be possible to produce. In the background we also finished up processing all of the CT scans, of which an overview article will follow next week.

To begin with, we made multiple 3D prints: plaster prints of all of the loose pieces and a tryout of structural solutions in Ultimaker2. The first one we decided to translate into a game during the science fair, while the second one was primarily made for the mid-project presentation. Moreover, we made a form with a CNC milling machine which was later used for vacuum forming. This proved to be the cheapest, easiest and the most user friendly object so far.
Plaster print
DSC_0380
Structural solution
DSC_0376 DSC_0375
CNC milling and vacuum forming
DSC_0377 DSC_0378 DSC_0379
Secondly, we discarded paper printing as a possibility due to two main reasons:
  1. Our files were too large to be opened in multiple programs with which we could have given the surfaces color;
  2. The delivery times were too long
This led us to choosing another form which would work the best in the Connex printer. Yet that would lead to rather large expenses, exceeding 100 euros per object. What is more, using soft materials would mean that we strive more for a visual than a functional prototype, since the objects could not withstand warm drinks or even a dishwasher. However, some of this could also be achieved by simply printing the different materials apart in the Ultimaker2. Simply put, we are still struggling to determine what fidelity level we are looking for and what each prototype can achieve. Moreover, instead of having a single idea to work out we actually multiple interpretations of the same object:
  1. Cheap, everyday object (vacuum form)
  2. Object focusing on the aesthetics of historical footprint/3D printing (Connex prints/plastic injection molding)
  3. A game, interactive cup (plaster print of shards)
In other words, it means that the objects form their own trajectories and cannot be easily compared with each other.
To conclude, we now have to focus on what precisely we want to achieve in these trajectories and how to do it using rapid prototyping techniques. That is not what we planned during the first week, but that will lead to more evenly divided workflow and, hopefully, more interesting results.

dinsdag 15 maart 2016

Comparison of image processing software 3, by Kotryna Valečkaitė


After multiple emails and a Skype talk we finally acquired a trial version of Mimics. According to their representative, the program is mainly focused at medical uses. Most importantly how do bones, implants react to friction and temperature changes.
This got us interested, since this was also rather important in our project: we were using CT scans to determine the break-line positions and in the end also fill up the missing shards with (possibly) other materials. In other words, it would be very interesting to see how different connections between materials would influence the durability of the object. I must add, that this is only a presumption after a talk with their representative and we might not be able to go so deep in the subject due to the time limitations. Yet this could be very interesting as a research subject for future students.
Having only a week of work left till the presentation, we decided to only  check what were the possibilities of the translation (CT-scans to .stl) procedure and if the results could be better than from Avizo.
The interface seemed clear, but more limited to what was offered at the latter program. It seemed actually very similar to already mentioned Seg3D, which is also focused on medical use.
Interface of Mimics
Interface of Mimics
After comparing multiple objects we came to conclusion that this program does not offer better translation. The meshing is coarser and even though the stepping is less visible, so are the break lines.
hagrid rhino
In conclusion, this program might offer higher possibilities going deep into material interaction(3-matic research), but for simple .stl translations Avizo is still the best option.
P.s. For post processing use MeshLab (open source!): there you can both reduce the fineness of the mesh and smooth it.

Reproduction Methods

As told in the planning, each of us would come up with a multiple reproduction methods for Harry. We pitched these ideas to each other and discussed which would suit the purpose of this project best. Afterwards everybody choose their favorite and best method, making sure we had a diversity of production techniques.
cupe◄Click on me!
Sander Plaster Print
The goal of this technique is to recreate Harry as well as possible. Therefore, the existing cup will be plaster printed in several pieces. Af varnishing the inner and outer surface, these pieces will be glued together in order recreate the cracks. The holes shall be filled with separately (Ultimaker) 3D-printed parts.

Irene Paper printing
Using the technique of 3D printing paper it is possible to make a relatively inexpensive product using a 3D printer. We don’t expect this technique to be waterproof. By experimenting with lacquer or varnish we can find out the possibilities to make the cups usable for daily usage. To print the rough version of Harry it will cost €34,- euros.

Kotryna 3d printing/plastic injection molding
With this technique we could achieve a very sophisticated look for a high end product. With this design we would bring out the beauty of 3D printing by making an expressive carcass which will either support the cavities in the structure or the whole structure. This also accentuates the historical marks on the object, which is necessary because the original form is then recreated in transparent material. The latter can either be achieved by plastic injection molding (which is beneficial if this is produced in larger numbers) or by using a Objet500 Connex printer (very convenient, because the whole object can be printed out in one go). Moreover, this design would be very interesting if steel 3D printing could be achieved in very small diameters, since then the translucent material could be glass.
Jorinde Vacuum Forming
The main reason for choosing this technique is because 3d printing is too expensive for a consumer product, so the product is still not used for its purpose. The most used cup has got to be the plastic disposable cup. This cup is made with the technique thermoforming, but this is not achievable in the short amount of the we have. Therefore the simplified technique vacuum forming will be used. With vacuum forming s sheet of plastic is heated and forced against the mold by the suction of air. It is important that form is mold-releasing.
With this technique it isn’t possible to use different materials or make holes. To preserve the historic character of the cup the difference between the shards will be made visible with a difference in height. CNC milling at PMB cost 10 euros.


Basic (existing) shape Cracks Holes Speciality
Sander Plaster, several separately printed parts Through glueing the parts together Seperately 3D-Printed Trying to recreate Harry as well as possible
Irene Paper
Different colour Low budget
Jorinde Plastic, vacuum formed as one part height difference
between the shards
Holes have to be filled, visable with height difference Making an old thrown away cup into a useable and disposable product
Kotryna  Plastic, (partially) 3D printed (and plastic molding)  Surface texture, carcass deformations  Carcass or carcass deformations (depends on the final design)  Showcase of 3D printing possibilities and accentuating historical footprint in newly added  details

CNC milling and 3D printing, by Kotryna Valeckaite


Today as a part of our minor our student group was introduced to CNC milling and 3D printing with Ultimaker2. Since we were free to choose the tryout objects, we decided on one of the .stl files we extracted from the CT scans. “Harry”, as our focus object, seemed like a great begin. Yet just after loading the files to Cura (the Ultimaker software), we noticed that the model was not completely straight. That was due to its original position during the scan. In other words, the object nested in-between two other objects was not completely parallel to the ground plane. This we tried to fix by manually rotation in Cura. In the end, it was not perfect and due to that the bottom edge of the cup was sketchy. Moreover, Ultimaker 2 seemed not like the right machinery for such task. That was mostly because we had many open, hanging edges and pieces which had to be supported. The latter is possible with the same material, but that leaves clear marks on the surface.
Removing support structure
Final product
Final product (1:2)
Parallel to 3D printing we also did some CNC milling. Just like in Ultimaker, we used “Harry”. For this production technique we used DeskProto. This program both translates the files for the machine and helps to create a frame for the object (mostly necessary to get a clear reference point). However, the latter can also be manually done in other CAD software.
Production of the object took merely 15 minutes, but we did not strive for the highest resolution. That meant that we took the biggest cutter available (d8mm) and got a sketchy cup with clear stepping. Moreover, due to the cavity in the cup and flexibility of the material, mistakes were made (seen in the picture below) and the model was very flaky.
foam harry
“Harry” from foam (1:1)
Since we had more than 1,5h left, we proposed to make another model in CNC machine. This time to see how much detail we could achieve. For this task we chose “Hermione” as the model, yet due to the time limitations we could only take a piece of it.hermione  We worked on the object from 3 sides, starting with 8mm cutter and finishing with 4mm. This procedure took at least twice as long as the previous one. What is more, during the first try the foam melted, completely destroying the model. In the end, results of the second one were not as clear as in the digital model, but still quite amazing: knowing that we used very soft foam, could not precisely put the model on the reference point and that we did not use the smallest cutter.
Foam "Hermione"
Foam “Hermione” (1:1)
In conclusion, the CNC milling could be an option for the final product, if we went for a single material transparent/translucent look. This would be possible by milling stacked and glued plexiglass. 3D printing in single material is also very interesting, but with this we would have to sacrifice some of the qualities of the end product (historical footprint, practicality, aesthetics).

vrijdag 18 december 2015

3D scanning and priorities, by Kotryna Valečkaitė

As the project slowly went into motion we had the first digitizing session in the laboratory of Geosciences&Engineering. Our group was provided with the luxury to first hand observe both micro- and macro-CT scanners in working. Both with their advantages and limitations, they gave us a new perspective of how to order and process given archaeological objects.
When Maaike came in with boxes full of ceramics from the Archaeological archive of Amsterdam, we understood that it was neither efficient, nor possible to scan them all. At this point selection was crucial. At first sight we had three main groups of objects: lice combs (highest level of detail), broken colored ceramics bound with metal strings (necessity to make more detailed scans to understand the technique) and sets of white ceramic tableware lacking multiple shards.
DSC_0381DSC_0307Detail hermione
The latter seemed to be the closest to the issues visible in the goal of the project. Yet the other two gave us interesting side paths which would improve overall understanding of the methods and possibilities of 3D scanning. Based on this, we made a queue sorted by importance, which would lead to at least one object of a group scanned.
DSC_0292
After the first inspection of the digitized forms we were rather amazed that the precision of 0,3mm was not sufficient for some of the fine-detailed specimens. E.g. the combs lost their teeth, metal bindings were muffled, crack lines barely visible. Consequently we were offered to work with much finer machinery (micro-CT scanner) mostly used for small scale material research. Yet the time and money needed for this method led to only two specimens scanned: the finest ivory comb and a detail of a metal connection. In total we got 13 scans, excluding identical scans in higher precision. The notes and conclusions after this are as follow:
1. There are 2 CT-scanners in the Geoscience&Engineering laboratory:
  • Macro-scanner can be used to scan rather big objects, but the fine details are almost completely neglected; object is stationary, thus there is a small chance of damage. Precision 0,3mm.
  • Micro-scanner is very slow (1h per object) and has very limited object size: till 100-120mm in diameter; object is rotating, thus it needs to either be glued or fixed, which requires extra attention not to damage the object. Precision 0,03mm.
  • Both scan only the form and not color; they can detect cavities, but not slight changes in the material density
2. The digitized forms are saved as 2D images of section cuts in .dcm or .ima file format, which need multiple steps to be converted into editable 3D objects. Even though we were informed that it is a very quick procedure, to gain fine details it is necessary to have a powerful computer(16GB RAM) and correct software (which is usually paid).