Posts tonen met het label cultural heritage. Alle posts tonen

dinsdag 4 oktober 2016

True replicas: its all in the trimming...

Jingdezhen is famous for it's super thin refined porcelain. This is why it was so much wanted and desired all around the world. Why the emperial kilns where in Jingdezhen for the exclusive production for the bowls, dishes and objects for the emperor in the forbidden city. I alway asumed that this insane thinness was achieved by throwing. But its not. its all in the trimming! Trimming is the process after the throwing, when the pots are placed on a spinning wheel and trimmed with special tools till they are so thin that the are almost translucent and as smouth as a shell...This same process is now being used to make my true replicas.


maandag 3 oktober 2016

True replicas: Throwing replicas


In Jingdezhen the porcelain clay is shaped by throwing on a wheel. That’s how they did it ages ago and how they still do it, nothing changed. The well kneaded clay is thrown hard onto the centre of the bat. Like a ballet the craftsman in now forming the clay into a bowl. Ones the wheel was made spinning by turning a long stick, now electric wheels are used. This craftsman I visited made me one Ming bowl in one cigarette, including the calculations compensating for the shrinkage of the clay after firering. Looking at the pictures of the original and with thousands of similar bowls in 'the memory of his hands' he shaped my replicas in know time. History and heritage are so alive here it sometimes almost make me cry...and here they don't care, its just what they do...


woensdag 28 september 2016

True replicas: Ye, the model- and mould maker


In Jingdezhen there are almost endless different neighborhoods specialized in different steps in the process of making ceramics. From clay refining to glaze mixing and from throwing pots in all sizes and shapes to carving incredible detailed decorations.  This process of porcelain making and all its steps are portrayed in the Museum of the Imperial Kiln site in the city. Today I was in Sculpture factory, one of these areas visiting Ye. He is modeling with and after my 3D prints, thus repairing the fractures and missing pieces. This resulted in a series of slibcasting moulds in plaster for porcelain casting. 


vrijdag 16 september 2016

True replicas: function and materiality


We reconstruct the past from 'sources': objects, remains and texts. They are discovered, excavated, collected and preserved, serving as sources to reconstruct and study our history. As a society, we derive our identity, our ‘sense of belonging’ from this heritage - these objects. But as soon as these objects became historical source and put in museums and storage, they left some of their soul behind.  These utensils lost their function, their nearness and role in human lives, their materiality.

With True replicas I want to give these objects their soul back: their function and the experience of their materiality. Therefore I use the replica, aiming to stretch the boundaries of traditional notions of the replica as an autonomous object based on a historical source. The replica as a means to give back a historical 'untouchable' object its function and material experience.

The goal of the project is not to make the most literal copy of the original. I want to use 3D prototyping technology combined with the traditional techniques used in the original to make these replicas. 
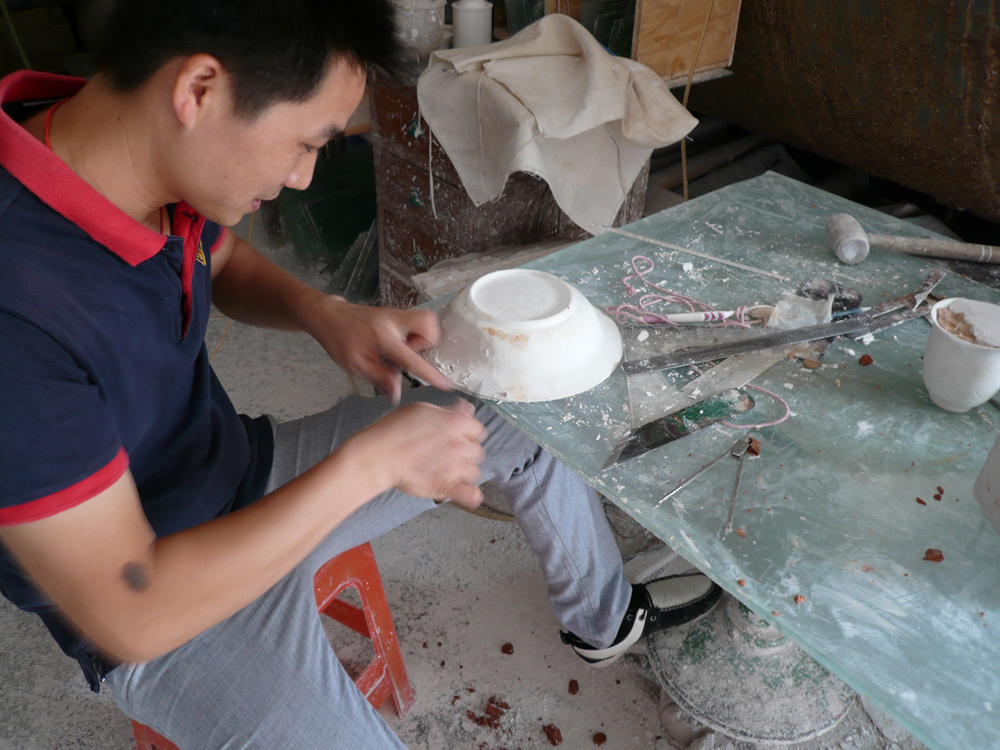
Merging material and immaterial heritage. Here in Jingdezhen I will explore how I can replicate a series of 17th century Chinese porcelain by using 3D scanning an printing techniques and by applying the ongoing tradition of porcelain production that still is (almost) unchanged since the production of the originals. The whole process of making these replicas will play a essential role in these new objects. Looking for true replicas in its most literal sense.

zondag 11 september 2016

True Replicas: the objects

Together with Archeologist Steven Jongma of Delft Heritage, I sellected 5 objects excavated in Delft. They all date back to the 17th century, are made of porcelain and are manifactured in China, probably Jingdezhen. This kind of porcelain was made specially for the export marked, following the 'western taste'. Some are broken and restored, some are broken and just put together.

'Klapmuts': A-2-21, excavated in 1972

'Klapmuts': A-2-21, excavated in 1972

cup, DL 88 V15

cup, DL 88 V15

'Klapmuts' OLD 74-1-1, excavated in 1974

'Klapmuts' OLD 74-1-1, excavated in 1974

Bowl, V4/7, excavated in 1986

Bowl, V4/7, excavated in 1986

Bowl, V4/7, excavated in 1986

Cup with relief, OKL 3

Cup with relief, OKL 3


dinsdag 6 september 2016

True Replicas: International Studio Jingdezhen

David Derksen, Hans van Bentum and myself will work on our projects for Museum het Prinsenhof at the International Studio Jingdezhen, run by Ryan Mitchell. The studio is situated in Taoxichuan, a vast area of the formal 'Universal' plate factory in Jingdezhen. This formal factory is tuned into a new centre of ceramics in the city, where artists studios, gelleries and workshops are housed in beautifuly restored factory buildings. Its a privilege and a pleasure to be able to work in this setting full of energy and vision for the future build on the old ceramic tradition and to be geast at the International Studio.

International Studio Jingdezhen 


dinsdag 15 maart 2016

Comparison of image processing software 3, by Kotryna Valečkaitė


After multiple emails and a Skype talk we finally acquired a trial version of Mimics. According to their representative, the program is mainly focused at medical uses. Most importantly how do bones, implants react to friction and temperature changes.
This got us interested, since this was also rather important in our project: we were using CT scans to determine the break-line positions and in the end also fill up the missing shards with (possibly) other materials. In other words, it would be very interesting to see how different connections between materials would influence the durability of the object. I must add, that this is only a presumption after a talk with their representative and we might not be able to go so deep in the subject due to the time limitations. Yet this could be very interesting as a research subject for future students.
Having only a week of work left till the presentation, we decided to only  check what were the possibilities of the translation (CT-scans to .stl) procedure and if the results could be better than from Avizo.
The interface seemed clear, but more limited to what was offered at the latter program. It seemed actually very similar to already mentioned Seg3D, which is also focused on medical use.
Interface of Mimics
Interface of Mimics
After comparing multiple objects we came to conclusion that this program does not offer better translation. The meshing is coarser and even though the stepping is less visible, so are the break lines.
hagrid rhino
In conclusion, this program might offer higher possibilities going deep into material interaction(3-matic research), but for simple .stl translations Avizo is still the best option.
P.s. For post processing use MeshLab (open source!): there you can both reduce the fineness of the mesh and smooth it.

Reproduction Methods

As told in the planning, each of us would come up with a multiple reproduction methods for Harry. We pitched these ideas to each other and discussed which would suit the purpose of this project best. Afterwards everybody choose their favorite and best method, making sure we had a diversity of production techniques.
cupe◄Click on me!
Sander Plaster Print
The goal of this technique is to recreate Harry as well as possible. Therefore, the existing cup will be plaster printed in several pieces. Af varnishing the inner and outer surface, these pieces will be glued together in order recreate the cracks. The holes shall be filled with separately (Ultimaker) 3D-printed parts.

Irene Paper printing
Using the technique of 3D printing paper it is possible to make a relatively inexpensive product using a 3D printer. We don’t expect this technique to be waterproof. By experimenting with lacquer or varnish we can find out the possibilities to make the cups usable for daily usage. To print the rough version of Harry it will cost €34,- euros.

Kotryna 3d printing/plastic injection molding
With this technique we could achieve a very sophisticated look for a high end product. With this design we would bring out the beauty of 3D printing by making an expressive carcass which will either support the cavities in the structure or the whole structure. This also accentuates the historical marks on the object, which is necessary because the original form is then recreated in transparent material. The latter can either be achieved by plastic injection molding (which is beneficial if this is produced in larger numbers) or by using a Objet500 Connex printer (very convenient, because the whole object can be printed out in one go). Moreover, this design would be very interesting if steel 3D printing could be achieved in very small diameters, since then the translucent material could be glass.
Jorinde Vacuum Forming
The main reason for choosing this technique is because 3d printing is too expensive for a consumer product, so the product is still not used for its purpose. The most used cup has got to be the plastic disposable cup. This cup is made with the technique thermoforming, but this is not achievable in the short amount of the we have. Therefore the simplified technique vacuum forming will be used. With vacuum forming s sheet of plastic is heated and forced against the mold by the suction of air. It is important that form is mold-releasing.
With this technique it isn’t possible to use different materials or make holes. To preserve the historic character of the cup the difference between the shards will be made visible with a difference in height. CNC milling at PMB cost 10 euros.


Basic (existing) shape Cracks Holes Speciality
Sander Plaster, several separately printed parts Through glueing the parts together Seperately 3D-Printed Trying to recreate Harry as well as possible
Irene Paper
Different colour Low budget
Jorinde Plastic, vacuum formed as one part height difference
between the shards
Holes have to be filled, visable with height difference Making an old thrown away cup into a useable and disposable product
Kotryna  Plastic, (partially) 3D printed (and plastic molding)  Surface texture, carcass deformations  Carcass or carcass deformations (depends on the final design)  Showcase of 3D printing possibilities and accentuating historical footprint in newly added  details

Processing scans into 3D models (take 2), Kotryna Valečkaitė

As promised a day ago we would keep you posted about our adventures with image processing software. Even though we did not receive the trial version of Mimics, Avizo provided a very pleasing outcome and it also read .dcm files.
The program itself is very user friendly and incorporates visual programming with automatized properties, thus giving  the user just enough freedom to not crash his computer or make the process incomprehensible. In this sense it is very similar to 3Dslicer, yet Avizo has more options and more finesse in the details.
The final result is not yet perfect due to rather clear “stepping” in the final 3D model. This, according to our “informer” from the Industrial design engineering faculty, could be solved with Geomagic. However, now we can clearly state that the plan A mentioned in this post is actually possible.
Interface Avizo Hagrid
Avizo interface
Hagrid in rhino via Avizo
Detail in Rhino

maandag 8 februari 2016

Processing scans into 3D models (take 1), Kotryna Valečkaitė

Comparison of image processing software 1

Directly after receiving the scans on Tuesday we jumped into processing them into 3D models. To keep it clear we used “Hagrid”(obj. 5) as an example for all of the programs.
As noted in the previous post, this process has multiple steps and in order to gain the highest level of detail, a lot of tweaking is necessary.
The usual procedure goes as follows:
(0. Changing the .ima or .dcm files into program compatible format. Most of our scans were made in .dcm format which was not compatible with multiple programs: so far we tried RenameMaster, which did not work)
  1. Loading the .dcm or .ima files into a 3D processing program. These file formats actually contain only 2D information: the sections of the object. In other words, the 3D model is an interpretation of multiple sections and therefore steps between them might be visible, if the resolution is not high enough.
  2. Selecting threshold and filtering the right information. Depending on the program this step might be automatized. If not, it might be very heavy on your computer. Therefore, a device with a good graphics card and 16GB RAM is advised (it would work on 6 or 8GB RAM, but it goes slow and tends to crash often).
  3. Loading the 3D file into a volume renderer to get an editable mesh (.stl). 
To begin with, we started with Seg3D. This program did not want to read .dcm files, thus we only worked with test files, which were in .ima format. The interface was clear, but to extract minuscule details it needed a lot of filtering and playing with histograms. That was extremely hard on our computers (6-8GB RAM, 2.0-2.03GHz) and took over an hour to get a decent file. Moreover, the final result is given in .nrrd format which later has to be translated to .stl with the help of ImageVis3D. The file looked rather detailed in Seg3D, but the final .stl was worthless.Capture
Hagrid_Seg3D to ImageVis3D_128x128x54mesh_detail
Later on, we received a tutorial from an past student of our supervisor Maaike. It suggested using DeVide. Unlike the previous program this one works on the basis of visual programming. Thus all of the steps can be easily retraced. This program can directly export to .stl reducing the possibility of getting a very rigid mesh, like with Seg3D. Unfortunately, the program did not want to work on our computers.
After this failure we contacted one of the researchers in the faculty of Industrial Design Engineering. He adviced to try out the following programs:
  1. 3D slicer (open source)
  2. Avizo (paid, evaluation copy available after contacting the firm)
  3. Mimics (paid, evaluation copy available after contacting the firm)
The first of the list (3Dslicer) proved to be very user friendly (although it did not read the .dcm files). The information is collected automatically after choosing a preset and is quite precise. One can also select if to smooth the surface: both outputs are interesting in form, with the edgy one as an expressive interpretation of a kitschy object of the past. If used for the final product, more mesh post-processing is necessary
3DSlicer_screenshot
Hagrid_3DSlicer_nonsmoothedges_detail (1)
Hagrid_3DSlicer_smoothedges_detail
To be continued…